I sampled his homemade gin at a holiday party a couple months ago and was blown away. First of all, it was so good you drink it straight, though importantly it must be very chilled. Straight gin sounds alarming, I know, but it was so deserving. You could taste all kinds of layers of flavor and freshness and juniper and I'm sure of it, the essence of the Pacific Northwest where he lives.
I immediately asked if he wanted to do a guest post on the how-to. Selfish reasons? Perhaps, but also I just found it so awesome I had to share.
Along with St. George's Terroir Gin (inspired by the mountain I grew up on), Henry's concoction is the root of my newfound love of gin. So thanks Henry!
Henry was apologetic about the quality of his photos, but I kind of fell for their Unabomber-makes-moonshine quality.
So here you go, Henry's Guide to Home Distillation:
This here is an absolutely bare-bones method of home
distillation that is reliable, costs about ten dollars, and is likely the
simplest and easiest way you’ll find to make high-quality gin at home.
Moonshining is a very old art with a long history in America, but seeing how it
remains illegal to operate an unlicensed still (mainly because the guv’ment
makes boatloads in liquor taxes), I’ll stick to the premise that you readers
are just curious intellectuals.
Before we get our hands dirty though, I’d like to lay to
rest a couple of misconceptions regarding moonshine that might be gnawing at
you.
1. You don’t need any fancy equipment. The setup I describe
here is simple, cheap and workable. Without a little patience though, you’d do
better to run to the corner for a fifth of Gordon’s and go back to daydreaming.
2. Properly made moonshine isn’t poisonous, and won’t make
you blind. This type of rumor probably stems from unscrupulous moonshiners
during prohibition who would stretch their liquor with toxic methylated
spirits, or ignorant ones who would use lead-based solder in their stills. A
quart of the gin I describe here will have less methanol in it than a glass of
orange juice.
Now, to work:
Fermentation
The first thing to do is start fermenting. Might as well
start now, as the process will take 10-21 days. One glossarial note: the
mixture you’re about to make of sugar, water and yeast is called “must.” When
it’s done fermenting it’s called “wine.” This recipe for moonshine must comes
straight from Dolly Freed’s incredible book Possum Living, which I highly recommend you read if this sort of thing is
interesting to you.
Now, assemble:
1. A five gallon paint bucket or similar (one of those big
blue Alhambras would work too).
2. Five pounds regular granulated sugar.
3. A big soup pot.
4. One packet ordinary active dry baker’s yeast.

Put a gallon and a half of water in the pot and put it over
a burner, then mix in the sugar until it’s all dissolved and turn the heat off.

.jpg)
Pour the sugar-water you just made into the bucket, then pour another gallon and a half of cold water in after. If it’s about room temperature, add the yeast. Yeast like a steady temperature between 65 and 90 degrees. Much hotter and they’ll die, much colder and they’ll go dormant. Cover the bucket with an old t-shirt, something so air can get in and out but flies and dust are excluded. Within 24 hours, the yeast will start eating the sugar and producing ethyl alcohol and CO2. You’ll hear them bubbling; it’s a glorious sound. Leave your must alone until they stop bubbling, and go set up your still.


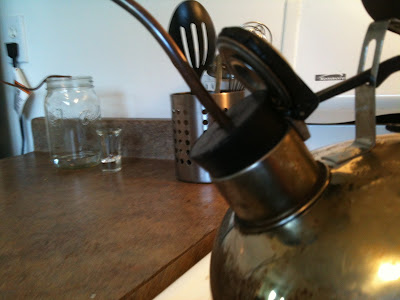
Distillation
This still is made of a teakettle and costs about four
dollars (assuming you already have a teakettle). Besides that, you’ll need a
rubber stopper the size of your kettle’s spout, and a 4-5 foot length of 5/8ths
inch copper tubing, both of which you can get at the hardware store. Don’t use
any metal in your still besides aluminum, copper or stainless steel. Hammer a
nail through the rubber stopper, then thread the tubing through the hole the
nail made. This tubing is your still-pipe, and it needs a specific shape in
order to work properly. Taking care not to crimp the tube, jam the stopper in
the kettle and bend your still-pipe to create a short rising section, then a
dip to run the pipe through a cold water bath, then a sort of shepherd’s crook
to bring the end of the pipe closer. Take a look at the picture to see how it’s
done. When you’ve finished, blow through one end and hold your finger over the
other to make sure air flows easily. That’s it: now you have a still.


When your must has stopped bubbling and turned to wine, pour it into your still no more than two-thirds full. With a three-quart kettle you’ll do “runs” of two quarts at a time. If you’ve done everything right, the wine is 10% alcohol (the natural limit of baker’s yeast), and there’s pretty much no unfermented sugar left in the solution. You can taste a little to see if it’s still sweet.
Assemble your still and turn the heat on medium while you
fill a tub with cold water and place it under the dip in your still-pipe so a
length of pipe is submerged. Ready a large jar and a shotglass.

When liquid
begins to come out the end of the still-pipe, turn the heat down low and
collect the first third of an ounce of so. These are the “heads,” and should be
discarded. After that start collecting the drops in the large jar and take a
taste of twenty drops or so every once in a while to check how it’s coming
along. The first few ounces will be very near pure liquor, and after that more
and more water will come up the pipe too. When it doesn’t taste of alcohol any
more your run is over. You should have about half a quart of 25-30% liquor.

Congratulations! You’ve made moonshine.
Two or three more runs like that and you’ll have enough
liquor for a fifth of gin. Combine the product of all 3-4 runs in a jar and add
a big handful of juniper berries.

Press them a little first, but don’t crush them. You can find juniper fresh by the side of the road in winter, or at your favorite food co-op. When they’ve sat for two hours, put everything (berries too) in the still pot and distill. Keep the heat low to go a little slower than usual so the juniper berries have a lot of time to soak in the hot moonshine. When this run is over, your finished product will be very strong, very tasty gin that you can water down to a more standard proof if you’d like.


Press them a little first, but don’t crush them. You can find juniper fresh by the side of the road in winter, or at your favorite food co-op. When they’ve sat for two hours, put everything (berries too) in the still pot and distill. Keep the heat low to go a little slower than usual so the juniper berries have a lot of time to soak in the hot moonshine. When this run is over, your finished product will be very strong, very tasty gin that you can water down to a more standard proof if you’d like.

 |
| Henry, maker of excellent spirits |

.JPG)
.JPG)


_crop.jpg)


